

x
Type in what your trying to find.
Type in what your trying to find.
We’ve used DIY aluminium Link Edge metal garden edging in several places in our garden – edging the front lawn, between gravel paths and gardens, and alongside rendered walls. It’s easy to cut and join, it makes smooth curves and circles and crisp straight lines, and it can even be shaped underneath to curve down a slope too. A good-looking, very versatile and high performance product. It’s 2 years on now and it still looks fabulous. ★★★★★

Sinuous curves along the stabilised path are defined by Link Edge
Why we chose metal garden edging
As our back garden design uses sinuous curves and complete circles, we knew that we’d need a flexible edging for our gravel paths and gardens. Treated timber warps and twists, can’t be bent around smaller curves, and doesn’t last long enough. Paver edging is too thick, can grow mould, and I wanted a smooth, continuous line, not one that was ‘chined’, ie made up of lots of small straight pieces. Poured concrete is also too thick and inclined to crack. We’d used plastic edging before and it’s awful – it twists and buckles and looks even cheaper than it is. Don’t go there!
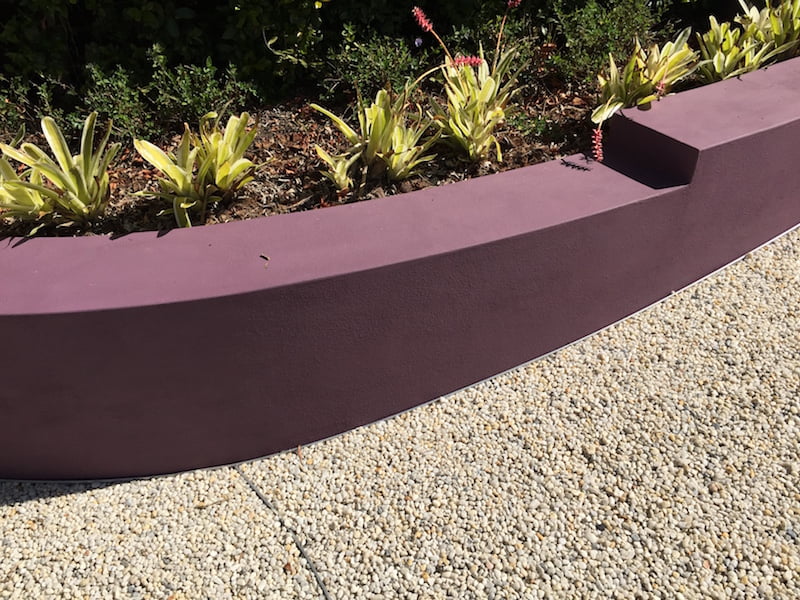
Link Edge is a neat, crisp edgeing detail against the rendered wall
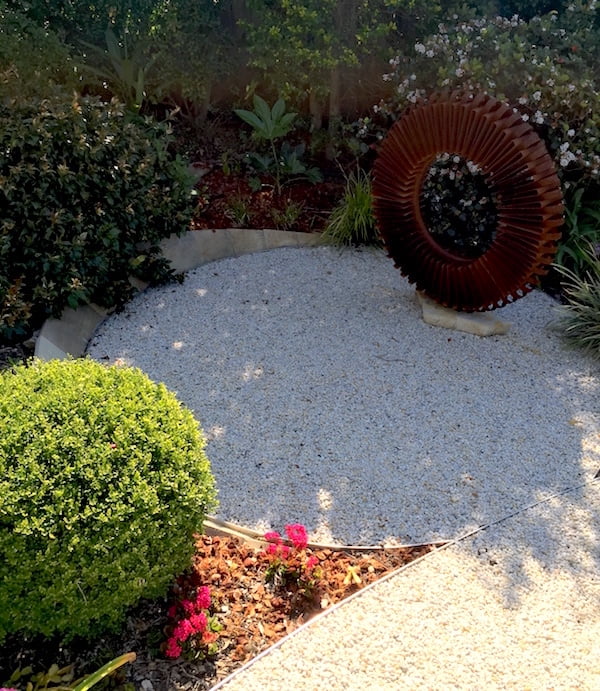
Link Edge defines the small circle
Why we chose Link Edge
You can buy both aluminium and steel metal edging. We chose aluminium Link Edge as:
• it’s suitable for when the edging will be only a light structural element – that is, it’s not retaining anything but some mulch or a few centimetres of soil
• is also capable of quickly and easily generating pleasing smooth flowing curves
• it’s easy to use for a handy person with limited tools
• it doesn’t require concreting or heavy tools needed for steel or masonry systems
• it can pulled up and reused many times or recycled as scrap metal.
I also liked its colour, which starts off silver and shiny but dulls as the aluminium oxidises to a neutral, light, silver-grey background colour, perfect in a garden. You can also order it in a range of powder-coated colours. Like the best aluminium and steel edging, it has a rolled top edge so there’s no sharp edge showing.
Its flexibility was especially important as we need to bend it not only in the horizontal plane but also down over a slope that does not descend on a constant radius. It does need some effort to get it to curve in a vertical plane but you can do it.
We also used it as a design element to define different areas of our stabilised gravel pavement.

75mm Link Edge showing the flanges
What does Link Edge look like?
Link Edge has a rolled-over squared top and spaced flanges at 90 degrees that enable you to splay or compress it around a curve. Every second flange has a pre-drilled hole through which you can insert and then hammer in a spike to hold it in position. You need about 2 spikes per lineal metre, more on curves and more on corners and joins. Taller link edge also has a slide-in spike guide.
Separate pieces are joined together by a fishplate connector that slides into the pre-made channel and you can also get corner joins.
Link Edge constraints
Aluminium edging is not as heavy-duty as steel, and if you want to use it as a mini retaining wall, or compact the surfaces next to it, or subject it to sideways forces like alongside a driveway, steel may be better, although Link Edge now makes a ‘heavy duty’ version as well, which it says is suitable for these applications.
Metal edging, including Link Edge, does not easily bend in the vertical plane. Installation guides for most metal edging systems make the assumption that you are only going to use them where you already have a nicely level garden, or one you can make so. Not so easy when you’re retro-fitting it to an existing garden, or around tree roots, or where there’s a sloping path which changes its grade along its length. That required a bit of (Tony’s) ingenuity but you can see that it can be done with a smooth curve in both dimensions.

Link Edge keeps the gravel from spilling into the gabion wall and provides a smooth curve both horizontally and down the slope
Where we used Link Edge
We used Link Edge: along in front of our curved gabion wall to stop the gravel on the path from spilling through the bottom of the gabion cages, and to shape the gravel paths and separate them from the garden. We also ran it in front of our rendered walls and used it define separate areas of gravel, so you can see a distinct outline of the complete lower circle. In the front garden we used it to edge the lawn. In several places the lawn is higher than the surrounding garden and in others it’s lower.
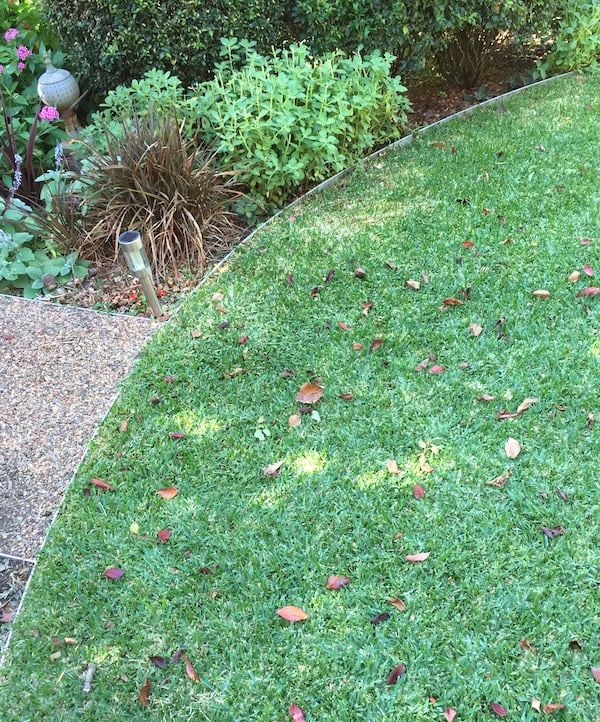
Link Edge defines the curve of the lawn
Laying-out Link Edge
Link Edge comes in several different heights between 40mm and 100mm for different applications and in 2m and 3m lengths which means we had to join lengths in several places along our long curves. I was a bit worried this would be obvious but it’s not at all. The joins are so unobtrusive that you have to look very closely to find them. Where we had a limited depth available because of tree roots we combined the taller 75mm size with pieces of a shorter 50mm version; they could be relatively easily joined together with a bit of shaping.

Link Edge joins are unobtrusive
The depth of the Link Edge and the height you install it will depend on the surrounds on either side. For instance, against lawn, the top of the Link Edge will be about flush with the grass, which means that if you are laying turf rolls (about 50mm thick) but have a lower level garden on the opposite side you may need one of the deeper Link Edge sizes.
As Link Edge naturally bends in one dimension only, it will form a nice smooth curve in horizontal planes but will be very resistant to bending in the vertical plane. Where an edge “rolls” over a crest or runs through a dip you will need to feather the underside of the Link Edge to ease it over a bend.
Do this by putting a hacksaw cut in the body of the Link Edge about two thirds of its depth from the bottom flange, taking care not to cut too far toward the top edge as it will leave the Link Edge less robust and risk exposing the cut on the finished job. You will need to take care to make a smooth curve as the Link Edge will tend to bend only at the points where the cuts have relieved the depth. The cuts should extend over whatever length you want the bend and more narrow cuts closer together makes it easier to create this bend.

Laying out path shape with Link Edge
Installing Link Edge
Installation guides tell you to grade the base on stabilised base material but in an existing garden this is almost impossible. We achieved a good result by grading the base in a shallow trench of approximately the desired curves and to a relatively even base. We then laid out the Link Edge with support blocks (such as small pieces of discarded timber) at intervals to allow the final heights and shapes to be checked.
There is minimum radius through which Link Edge can be bent smoothly and it is smaller (about 200mm) if the bend is away from the flanges as the flanges will stop a tight radius bend when they are on the inside of the curve. If it is necessary to make a tight bend with the flanges on the inside, the flanges can be either cut or bent out of the way. The flanges can be relatively easily broken off by gripping firmly with strong pliers and bending back and forth a couple of times.

Laying out and installing the larger circle with Link Edge
Care needs to be taken to bend a smooth curve the first time. Once a length has acquired a sharp or uneven angle it is hard, but not impossible, to reform it into a smooth curve.

Installing Link Edge where it curves in both planes
Pin the Link Edge at intervals with 150mm or longer galvanised spikes to maintain the shape while the support blocks maintain the height. High spots can be seen and the base course shaved away with a trowel or spade and low spots identified for filling with concrete – but don’t use ‘quick set’ concrete mix as its additives are corrosive to aluminium.

Link Edge around the larger circle after filling with stabilised gravel
A mixture such as premixed bags of concrete mix with a small aggregate size can be placed by hand under the Link Edge flanges. Some of this will provide the locating and support strength so the support blocks can be removed if they intrude into the garden or lawn on either side of the edging.
The product uses shaped fishplate joiners between lengths but for more adventurous shapes some additional fastenings are required to anchor the fishplates, or you can make other odd angled joins using aluminium offcuts. The aluminium Link Edge may eventually corrode if you use certain metal fasteners (because of the Galvanic series). Aluminium pop rivets are safest but I decided the ease of use of self drilling roofing screws meant that galvanised screws could be used and we live with the possibility of light corrosion. Where our Link Edge needed to be up hard against either a gabion or a rendered wall, we also fastened it to the wall.
Some of our home-made joins:


Overall assessment of Link Edge
Link Edge is an easy-to-use and very attractive edging which is capable of forming crisp but smooth-flowing curves through a landscape without intruding or adding an element of its own. It’s now 2 years since it was installed and it’s still functioning well and looking great.
[Note 1: We paid full retail price for our Link Edge from a retail landscape supplies outlet.]
[Note 2: Although Link Edge is only available in Australia, there are also flexible aluminium lawn edging products available in the UK (Rite Edge) and Curv-Rite in the US. However these have not been either tested or reviewed.]


I have to agree with this review. As far as user-friendly and quick to install edging goes this is one of the best products out there. You get a solid, professional finish with a minimum of effort.
I wanted to install two arty-looking rings in my nature strip for sowing native annuals and after looking at my options Link Edge won out for the reasons above. Forming it into rings was, as you say, Catherine, tricky. But it’s a forgiving material to work with.
I would like it better if it was cheaper, but then again I have Scottish blood so miserliness is an innate state of being.
Ha! As a Stewart, I share your pain. However I figure it’s one of those things that ends up saving for you in the end.
Hi Catherine, I really like the look of this product and what you’ve done with it. I was wondering if there is need to spike every hole on relatively straight runs? I can imagine curves would require spiking every hole. Also is it easily susceptible mower damage? Or would you recommend giving it wide birth when mowing just to be safe, then neaten up with a line trimmer? Thanks for the great review, You’ve given me a few ideas. Doug
Link Edge’s installation guide is that you only need to use about 4 spikes per 3 metre length but I think that also depends on how firm your substrate is. If your base course is not smooth and level, which it’s hard to do with big tree roots around, you can bridge any voids by pushing some dryish concrete mix in underneath to give it more stability. Re the mowing – yes – a rotary mower dropped down over the Link Edge will chew it up. We mow up close and hang one wheel over the edge but you have to be careful to keep the body of the mower and its blades on the lawn side of the Link Edge. Then we neaten it up what’s left with a line trimmer.