

x
Type in what your trying to find.
Type in what your trying to find.
The soil on my original block is a deep clay. I love that clay because my land is sloping, so drainage isn’t a problem, and because once you improve clay with organic matter and
gypsum, it’s the most fertile soil on earth: in my opinion much easier to work than sandy soil. I greatly respect gardeners in Western Australia and along our coasts who create beautiful gardens on deep sand.

Beneath the stone layer is fertile clay soil
My original block has no rocks – or none until well below planting depth – so when my neighbour warned me before purchase that the new block was “very stony” I was, as I mentioned before, surprised. I half-heartedly stuck the spade in here and there – really, how much different could it be? Oops!
Hidden under one of the blackberry thickets was a large pile of stones and broken bricks; I assumed most of the stones were building rubble. Wrong again!
As I began digging out the blackberries I discovered many more stones, from fist- to football-size and larger. At the eastern end, the stones are closer to the surface and more rounded and weathered; towards the west, more angular. 40-50 centimetres below the surface, the soil is the same fertile orange-yellow clay as in my original block; scattered through this are angular orange rocks. You can see the soil profile in the picture of the excavated seating area.
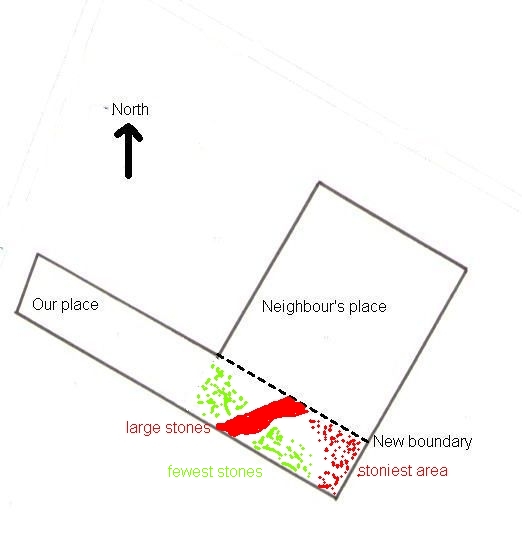
Plan showing stone layers in the new garden
Bisecting the block through the centre, from southwest to northeast, is a strip where the orange clay is closer to the surface, and the stones in this area are particularly large. I dig around them, and Geoff lifts them out for me.
Initially, I was rather dismayed by the sheer number of rocks – piles and piles of them everywhere! – but ,as I began building paths and the associated terracing, I quickly realised that I’m actually extremely lucky. The stones are fractured – that is, not a solid sheet – and come out easily. Plant roots have no barrier to penetrate deep into that lovely clay and, best of all, I have plenty of material for retaining walls.
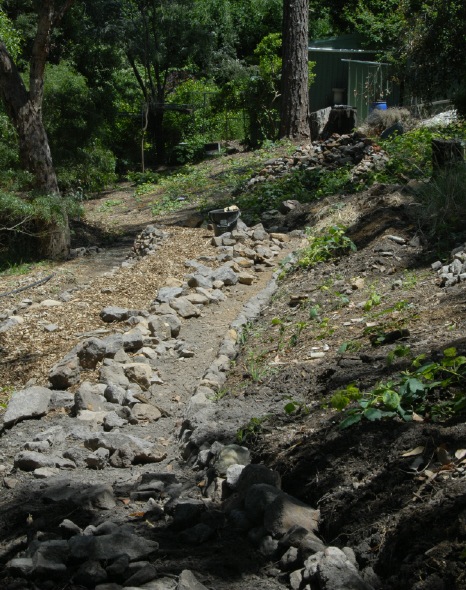
Hundreds of rocks turned up by digging
As I establish each terrace above the paths, I use the pick (it’s too stony for a spade) to dig every square metre of soil to a depth of about forty centimetres, and use the rocks I excavate for retaining walls – two birds with one stone, so to speak! Time-consuming, yes, but another one of those jobs that’s worth doing properly before planting.
I built retaining walls with proper walling slate in my original garden, but these uneven rocks, of various sizes and ranging from blocky to rounded, are much trickier. I have to admit that I felt nervous about displaying my walling skills (or lack of them!) to the world: a friend kindly described my walls as rustic or “vernacular”! In other words, they’re very uneven! But then I reminded myself that I’m no mason, and that this garden is all about having fun. I need impress no one; it’s my own patch, and the walls need please only me!
New wall & stone pile from a newly dug path
I know many gardeners strive for perfection – it’s part of what motivates them – but that’s not what gardening’s about for me. For me, the fun is in the process and in function; worrying about perfection completely contradicts my aims, because it spoils my fun! I mentioned earlier that I’m not a fan of ‘Instant Makeover’ garden programs, welcome and worthy as they might be for the owners. It’s also because I believe such programs are about ends; the means is an inconvenience to be rushed through. But “gardening” is a verb, not a noun! In my opinion, these programs often promote an unrealistic idea of gardening and what can be achieved by ordinary gardeners; at worst, they’re daunting because gardeners like you and me can never create a garden in that way.

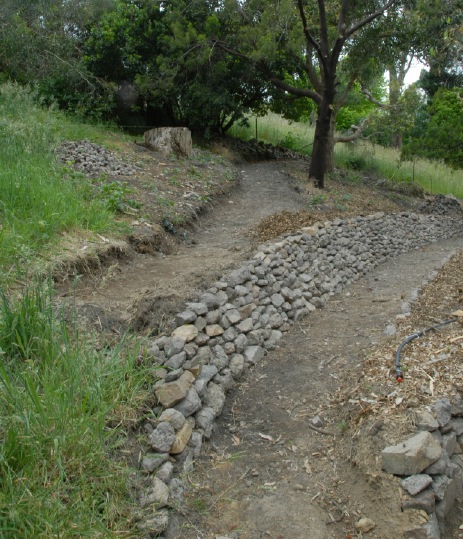
I start each wall with the larger rocks
For my walls, then, the most important thing is that they last and don’t collapse, so I’ve been careful about the batter. I reserve smaller stones for lower walls, and increase the batter. Stones that are too small for walling I use as shims, and as chocks behind the walls to improve drainage and to provide a solid base. The pics show my progress.
Dry stone walls are great because they rarely have drainage problems and, if you lay them properly, gravity holds them together better than can any mortar. So don’t be daunted about giving it a go yourself, because you’ll find you get better as you go along (but start your wall at the least visible spot!). And check local council regulations because some include height restrictions for building your own retaining walls.
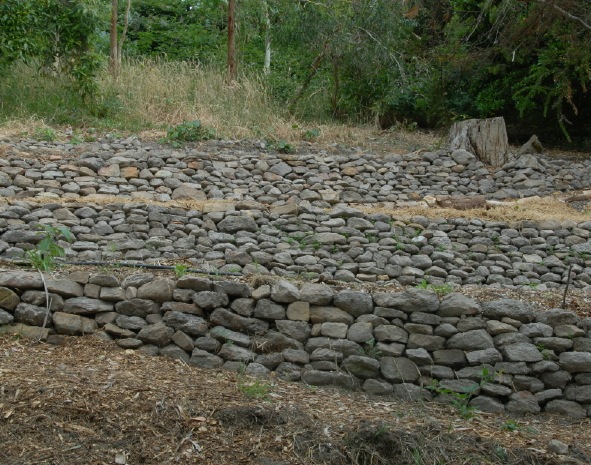
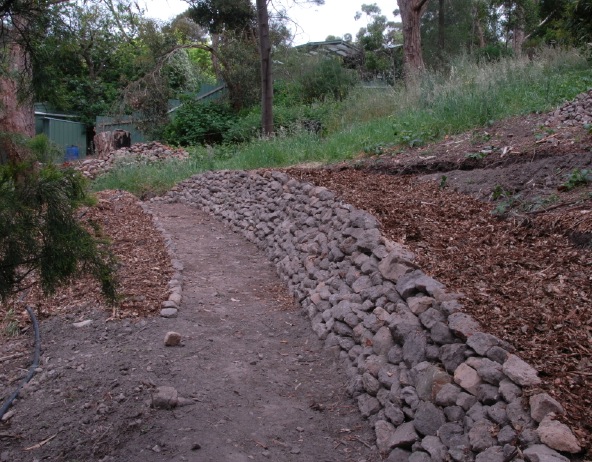
My “rustic” or “vernacular” stone walls
If the wall is low and your rocks are large, you’ll probably be fine; if the wall collapses, you’ll have the skill to do a better job the second time around! I haven’t used as many tie stones as are recommended but I’m hoping my walls should still be okay because at depth the clay soil behind them is highly compacted. They might sag in the few areas with deep compost, though: we’ll revisit in a year’s time and see how they look!
A slope, or batter, gives the wall stability
In the meantime, I’ve been considering the dry stone walls around Australia with a fresh eye. On a recent visit through the Victorian Otway Ranges, I was blown away by the amazing walls. Many other people clearly appreciate dry stone walls, too: see the Dry Stone Walls Association of Australia
The albums on this website are wonderfully reassuring for the variety of styles (and quality!) of walling! In any case, the fact that I’m placing all the stone myself, and that all the stone is sourced from my property, makes for a consistency that should promote a unifying effect. Another advantage of using local stones is that the mosses and lichens will soon grow on them, softening the overall appearance still further.

Terracing & new walls create a level area
I’ve discovered several things about walling. Large stones are more stable, easier and much MUCH faster to use than small ones. I need string lines to create an even slope along the top but I’m not worried too much at this stage about getting it perfect, because I’ll use large, flat capstones later. Right now, structure is the most important. I’ve done forty to fifty square metres of wall so far, with another twenty to thirty to go.
When walling I always wear cheap leather rigger’s gloves. Even so, I have to break up walling stints because the work is pretty tough on fingers with a touch of arthritis. If you’re doing a lot of walling, it’s definitely worth planning to accommodate the physical strain on your body and any particular weak points before you start.

Temporary wall of pine rounds & rocks
Above the chicken coop, I’ve improvised a temporary retaining wall from pine rounds and rocks. Of course the pine won’t last long – perhaps two years – but the logs were right there, too heavy to lift and too fresh to split. It looks okay and will do for now and I’m sure I’ll have plenty of stone left to build the wall down the track! When the Canary Island pine gets felled I may do a low freestanding equivalent to replace the lower fence.
I’m not sure yet what I’ll do with the smallish leftover stone, but plenty of ideas can be found and adapted if you google images for ‘land art’ or ‘stone cairns’. I’d greatly welcome any and all suggestions from readers and listeners, especially pictures!
Like so much in gardening, the stone on my property is classic ‘glass half full’ rather than half empty: more work initially, but useful in the long term. In fact, everything about this garden has a glass half full aspect. The trees create shade and root competition, but will protect vegies from excess sun in summer, and the garden is very sheltered – wind won’t ever be a problem. The land valuer sneered at the slope, but slope instantly provides you with many beautiful landscaping options you just don’t get on flat ground. I’d like more land, but this size is completely manageable and I’ll easily be able to maintain it for years to come. Perhaps all gardeners are glass-half-full people, or they’d never start in the first place!


