

x
Type in what your trying to find.
Type in what your trying to find.
Living and gardening in small spaces has always fascinated me. I love the challenge of using space creatively. I remember poring over ‘The Apartment Book’ years ago to see how they turned tiny spaces into really beautiful, functional and warm living areas. So when I was looking for a new project, I thought about turning our tiny balcony – barely 1m wide and 2,5m long – into a food garden to see how productive such a small space could be. Sort of like the garden equivalent of a bachelor flat. Actually more like gardening out of a closet!
I hope that sharing my experience (including my disasters) will help, and maybe encourage, any other gardeners (or would be gardeners) who only have a balcony or have run out of garden space down below.
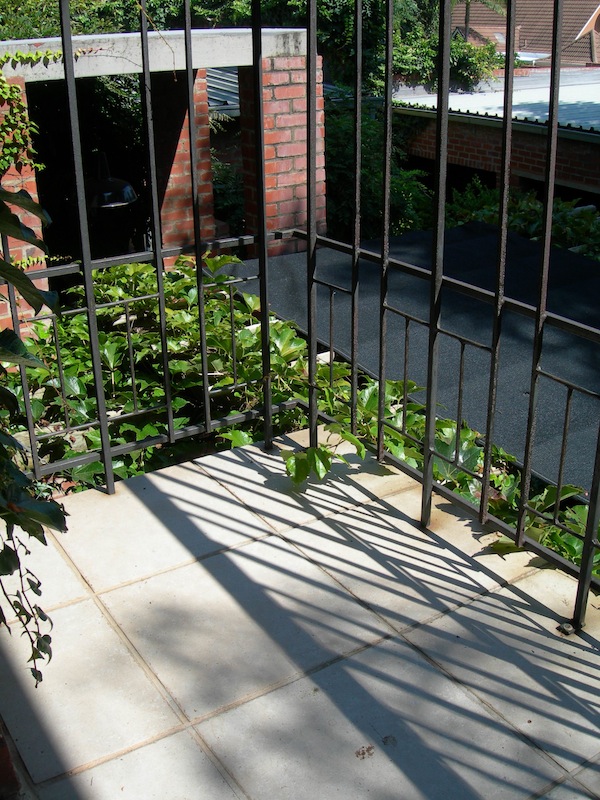
The tiny balcony, not even big enough to swing one of my nine cats
Starting a balcony garden: February 2012
First things first
Sunshine – check the amount of sunshine and light that the balcony receives. Mine is north facing, so will receive more and more sun as we move towards winter. Veggies and herbs need sun, there’s no way of getting away from it. In the southern hemisphere, east or north facing balconies are probably best. West facing balconies can get very hot in the afternoon. Not impossible but may need shade cloth or additional watering.
Sow for the season – Sowing the right veggies for the right season still applies. For us, February/March is good for sowing autumn and winter veggies. This is the list that I considered:
Bush beans (time for one last sowing), Asian veggies, broccoli, cabbage, carrots, lettuce, baby salad leaves (rocket, beetroot, baby spinach leaves), lettuce, Swiss chard/spinach.
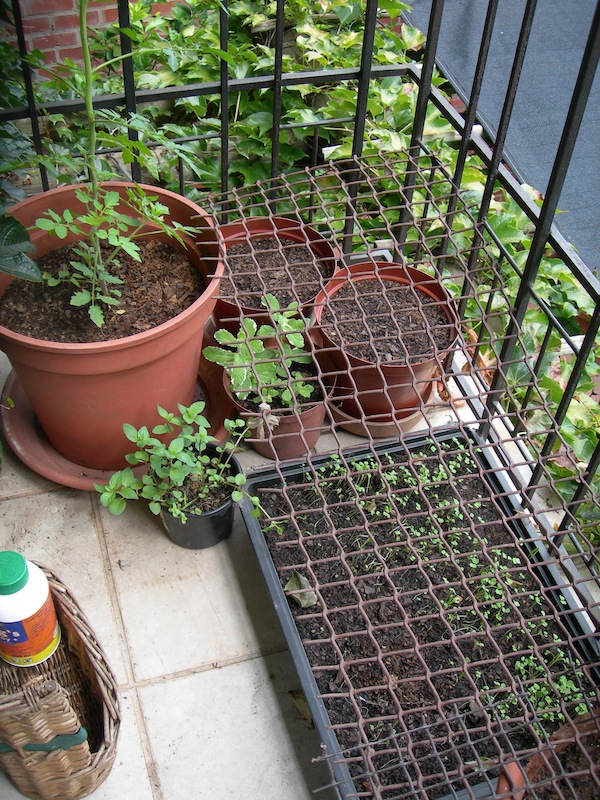
Space – ultimately dictates how much you can grow. Also bear in mind the weight of containers filled with soil, plus your weight as you potter about. Terracotta and heavier pots look great but they do get very heavy!
I am a bit of a cheapskate so I used plastic pots because I have plenty available.
In the end, space dictated that I sow baby carrots in a window box, baby cabbage ‘Red Primero’ into two pots (two seeds per pot), broccoli into two pots (two seeds per pot), and a large seed tray of mixed salad leaves.
To this I added two pots of two-month old cherry tomatoes as an experiment so see if they survive winter because of the sheltered and sunny aspect of the balcony, and using these tips on pruning tomatoes to maximise fruit production. Then I filled in with a pot each of peppermint and pineapple mint. (because I had them)

Satisfaction: pots filled, seeds sown, and ready for growing. Resist the temptation to start with too many pots because you still need space to move
Tip: choose compact, upright growing veggies that don’t take up too much space or veggies that can be trailed along a trellis. I love the idea of a vine covered with little red tomatoes.
Getting started – Just do it!
As I go along I think I will find better ways to use the space but the important thing is to start.
Potting soil – a good mix is 50% potting soil and 50% palm peat brick, hydrated in water. It makes a nice, light, mix that allows the water to drain through but also holds the water. The bedding plant growers recommend this mix. Add in 2:3:2 (Vita grow organic).

The palm peat swelling up. Use hot water to speed up the process
Sowing: sow the seed directly into the pots. Cover with a light layer of potting mix and firm down so that the seeds come into contact with the soil. Water afterwards.
Watering – Keep a watering can on the balcony so that it is easy to water the seed trays/pots every day. During germination the soil should not dry out. To prevent washing the seeds out of the soil, start watering away from the pots and swish it over so that the drops fall evenly. Finish watering away from the pots because the last drops from the watering can tend to be heavy and large.
First problem – watering on a balcony! Not too much of a problem in my case because the water that runs off just lands on the patio below, where, hopefully, nobody is sitting, otherwise they’d experience a nice outdoor shower.
But, if there is another apartment below, the occupants won’t appreciate water dripping down their walls or onto their balcony. It could also cause damping of their roof. Saucers under the pots should help and you need to water carefully so that there is not too much water lying on the floor that can seep into the structure. I’d also suggest putting larger seedling trays on top of a thick wad of folded up newspaper to absorb the water.
Cat and bird proofing – any cat lover will know that a tray of soft soil is like 2ply toilet paper to a cat. Irresistible! Although it doesn’t look very glamorous, plastic mesh works well. It is easy to cut to size. Just lay it over the pots. This should also keep birds away. My cats are not much of a deterrent.
Day 4 after first sowing
The first seeds have appeared – I think either the rocket or the baby spinach in the large mixed greens seed tray. I always get such a kick when the seed sprouts.
Two days later, noticed the broccoli has sprouted. Nothing yet from the cabbage or carrots. Worried that the carrots might be old seed.
Rocket seeds have germinated. They are always incredibly quick. Note the cat-proofing. Very effective unless one of the cats decides to use the pot as a couch
Watered daily to make sure the seeds didn’t dry out.
Have moved the mixed greens tray more into the sun as I noticed that one half of the tray is doing better and the plants are all leaning noticeably towards the sun.
Did you know that running your hands over the tops of seedlings produces sturdier plants? Apparently they are fooled into thinking that a herbivore is about to munch them and they release a hormone (chemicals?) to help them withstand the shock.


Hi Alice, Interesting! I’m in Australia and wondering where in the world you are now?