

x
Type in what your trying to find.
Type in what your trying to find.
We’re on the verge of spring in here in Melbourne, and us gardeners are always looking for ways to increase our chances of success, be it in growing fussy plants, having the tallest sunflowers or the biggest tomatoes. Each of these things start with a single seed. Sowing seed and getting it to germinate are easy enough, but from there on the battle to keep them growing at full pace, with the right amounts of water, nutrients and light begins. When I first started growing from seed my early attempts were dismal and overcome only with a certain level of mollycoddling that I found trying.

My self-watering pot success, 4 weeks on
Even now I find sowing in reusable seedling trays something of a challenge. They have the advantage of heating up quickly in the morning sun, which makes them great for getting seedlings up, but they lose water very quickly at the other end of the scale. I often struggle to keep the water up to them, especially once the weather warms and they require watering a couple of times a day, sometimes more. When visiting friends out bush on weekends, returning home to a tray of fried or struggling seedlings I’d forgotten about in my haste is all too familiar. One way I’m trying to increase my chances of success this year is by sowing seed into home made self watering pots, and so far so good!
What you’ll need to make a self-watering pot are simple, cheap materials that are readily available:
1. Styrofoam box that will hold water
2. A ‘wicking’ medium to fill the bottom 5cm of the box with, such as gravel, sand, perlite or bark
3. Two pieces of tubing such as old irrigation extender pipe, agpipe or old plumbing pipe. You’ll need one about 10cm (4″) long for the drain, and another about 30cm (12″) long for the watering pipe, and a screwdriver to punch the drainage hole
4. Potting mix and seed raising mix to fill the box
5. Shade cloth

Materials to make a self-watering pot for raising seedlings
How to make a self watering pot
1. Start by filling the bottom of the box with your wicking medium to a depth of 5cm. The coarser the medium you use, the larger the spaces in-between the aggregates and the more water it will hold. Things like sand will hold less water, while gravel and perlite will hold more.

Using perlite for my wicking medium and punching a drainage hole through the box
2. Next up, punch a hole in the box from the inside at the same level as the top of your wicking medium, then slide the 10cm piece of tubing through it – this is the drain for the pot where excess water will run out.
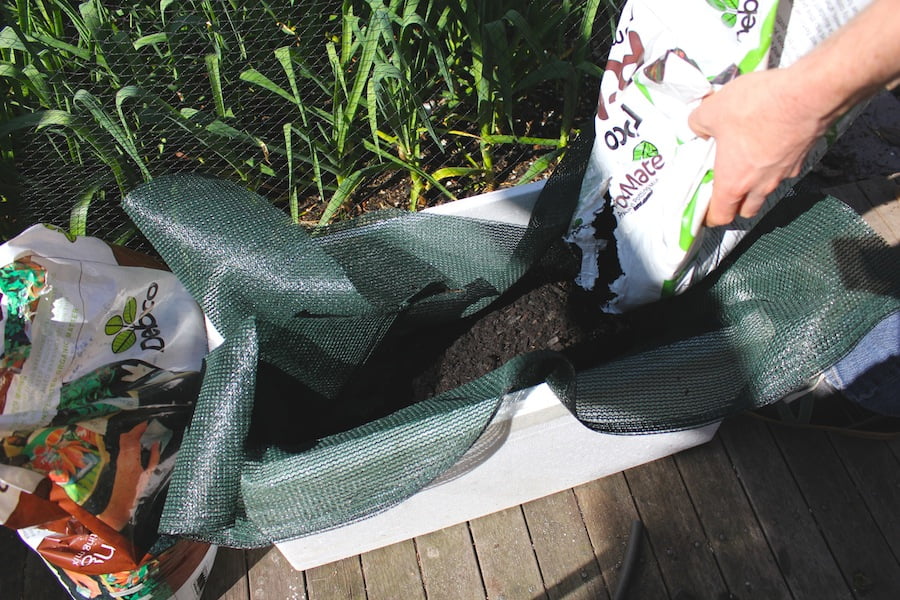
Line the box and fill it with potting mix first, and then a layer of seed raising mix
3. Line the box with shade cloth and then fill almost to the top with potting mix, leaving the last 5cm, and top with seed raising mix.
4. To complete your pot, gently pull the side of the shade cloth and slide the 30cm bit of tubing down the side until it touches the top of the wicking medium – this is the tube through which you water your pot. Fill up your reservoir with water and you’re ready to go. What could be easier?
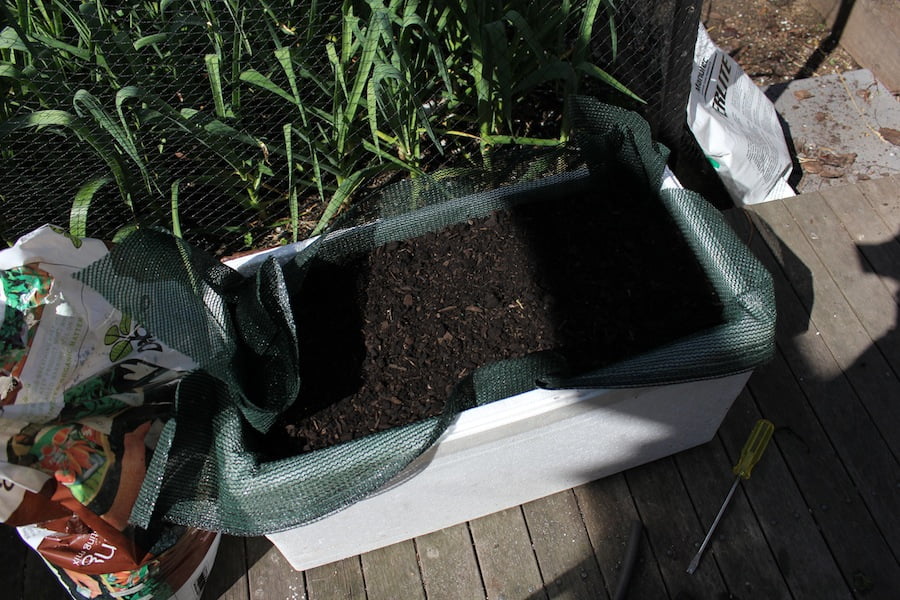
All I need to do now is trim the shadecloth to tidy it up
The pot’s genius lies in capillary action – the special property water has to pull and push itself in different directions over small distances, even against the force of gravity. The water in the reservoir is literally pulled into and through the potting mix, watering plants from below. Despite styrofoam boxes having a face only a mother could love, there is a beauty in their simplicity and effectiveness for growing plants by this method.

Self-watering pot ready for sowing seeds
After sowing seed directly into the mix, watering them in for the first time overhead is essential. This engages capillary action when the water from the top meets the water being drawn up from below; from then on you only water through the tube. The water reservoir will continue to irrigate the pot for up to a week, or more in mild weather. Seeds are kept constantly moist until they germinate and have optimal levels of moisture to keep-on-keeping-on. All you have to do is top up the reservoir once a week or so. No more watering twice a day and no more tragedies when returning home from a last-minute weekend away – brilliant!
My plan is to grow seedlings in the boxes until they’re ready to plant out. I’m also going to dedicate one pot to growing an experimental crop of rocket in the hotter months, a plant that always bolts once the weather warms up. This method suits a whole suite of leafy vegetable seedlings, from Asian greens like kai-lan, celtus and mizuna, to spinach, lettuces and herbs. Any seeds can be raised in self-watering pots, but I’ll stick to growing seedling like tomatoes and capsicums in small individual pots. I’ve even put the magic of wicking action to work by building a self-watering propagation house out of a large plastic storage bin, using sand as a wicking medium and an upside down bottle as a water reservoir.

Seed-raising success through dry, warm weather, four weeks on
Self-watering pots are not limited to raising seedlings, and nor are they limited to growing in styrofoam boxes. Almost any container that holds water can be used to make one. Imagination is the only limitation. I would encourage any keen gardener to build at least one just to see how effective they are. While I haven’t collected data on their water usage, I suspect they use much less water than pots requiring overhead watering.
So get an edge on your gardening mates and have a go at a self-watering pot, but be warned that it might be hard to stop at just one (I’m up to five boxes already, and I keep eyeing the old wine barrel with intent). You’ll use less water, have strong seedlings, and increase your chances of success, even in the hottest weather.
Until next time, happy gardening.


After planting basil and okra in shallow seed trays today, and hearing about tomorrow’s 35 degrees with strong northerly winds (when I’ll be at work all day)… I reckon your method sounds WAY better, even with the plastic I plan to cover the tray with.
Great post, James, and I’ll be giving it a go!
cheers
Helen
Hi Helen,
It works a treat, but I should mention I ended up having to cover the lettuce box with a clear sheet of perspex just to get them to germinate, which took two days – after that I removed it and they took off.
Hi James,
Sounds like a godsend for me, I live in Woolgoolga, just north of Coffs Harbour, near the sea. Frosts and cold weather are not a problem but raising seedlings is very iffy in these hot conditions. My raised veggie garden beds are in full sun but I am uncertain about where to put my seed raising pots, full sun, part shade or full shade? Your advise would be most helpful.
John Langhorn.
Hi John,
My boxes get morning sun until about 1pm, and that’s all. It’s enough for continuous picking greens like lettuce and asian greens.
Hope this helps.
James
What a fabulous idea! I use self-watering pots extensively, but it had never occurred to me to use them for raising seedlings. I’ll certainly give it a go this year.
Great idea! I’m raring to go but I’m not clear on the drainage. Do the drainage pipes have to have to be perforated to work?
Hi Robbin,
The drainage pipe I’ve used is solid irrigation pipe runner. It doesn’t need to be perforated, but it wouldn’t hinder if it’s all you had – the beauty of these boxes is that you can use whatever’s at hand. As long as the drainage pipe allows the excess water in the reservoir to flow freely, you’re plum.
Cheers,
James
That sounds like a great idea. I haven’t had much luck growing from seeds. Lazy watering is most likely the cause. Would you suggest covering them to allow them to germinate properly?
Hello Johnson,
Lazy watering would likely be the culprit. You could cover them to increase germination rates – something like a large plastic bag or sheet of perspex would do the trick. However, these boxes maintain an even moisture, even just below the surface of the mix. If you’re growing things like lettuce then they should germinate without covering the box. Best of luck!